
Automate Shopify Product Dates with Make.com and n8n

You've already got Make.com or n8n handling your back-office automation. Orders drop, rows log, Slack pings, CRM records update, the whole thing runs on its own. So the natural next step is wiring product dates into the same stack: expiry date arrives, draft the product and notify the team. Launch date comes, publish it and fire a channel message. The only problem is neither Make nor n8n has a trigger for a Shopify product date sitting in a metafield. This post covers why, and the cleanest way around it.
Why Make.com and n8n can't watch for a Shopify product date
Neither Make.com nor n8n has a trigger that fires when a date stored in a Shopify product metafield arrives. Their Shopify integrations are event-driven: a product is created, updated, or deleted. A date sitting in a metafield isn't an event. It doesn't announce itself when it becomes today.
In Make, the Shopify "Watch Products" module runs on a polling schedule, checking for product changes. If a product's expiry_date metafield was set three months ago and nothing about the product has changed since, the module won't surface it, because no change happened. The date passing is invisible to Make from the outside.
n8n has the same constraint. Its Shopify trigger node covers the standard event types: products/create, products/update, products/delete. Those are Shopify webhooks, and Shopify only fires those when something changes. A date you typed into a metafield in February doesn't trigger a products/update event when June rolls around. It was always June. Shopify just didn't notice.
Shopify Flow has the same limitation and for the same reason. I covered that in detail in a separate post on why Flow date comparisons break. If you've tried Flow, you'll recognise the pattern.
So if you've built a "fire when expiry date arrives" scenario in Make or n8n and found yourself stuck, you haven't missed a setting. The trigger you're looking for isn't there.
How DateCue becomes the missing trigger
DateCue checks every tracked product every minute against its date metafields. When a date is due, it fires an HTTP POST to any URL you choose. Point that URL at a Make Custom Webhook or an n8n Webhook node, and your scenarios wake up the moment a product date arrives, no polling, no custom code to maintain.
The architecture is two layers. DateCue is the date-watcher: it owns the "is today the date?" logic and fires once when it is. Make or n8n is the action layer: it owns everything that happens next. You don't rebuild the scheduling logic in your automation platform. You just receive the signal.
I've covered the DateCue webhook action in detail for anyone who wants the full picture of what fires and what the payload contains. The short version: DateCue posts a small JSON body with the product ID, title, handle, the date metafield value, a unique execution ID, and the action type. Everything Make or n8n needs to identify the product and route it.
💡 The model: DateCue watches the metafield and fires once when the date is due. Make or n8n catches the webhook and handles everything downstream. The scheduling lives in DateCue, not in a polling step inside your scenario.
How to set up Make.com for a Shopify product date
In Make, you receive a date-triggered event by creating a Custom Webhook module as your scenario trigger. Make gives you a URL, you paste it into DateCue, fire a test, and your scenario is ready to build from real data. The whole setup takes about five minutes.
Step 1: Create a Custom Webhook in Make
In Make, create a new scenario. For the trigger, search for Webhooks and choose Custom Webhook. Click Add, give it a name (something like "DateCue product date"), and Make generates a unique URL that looks like https://hook.eu2.make.com/abc123xyz. Copy it.
Step 2: Add the webhook action in DateCue
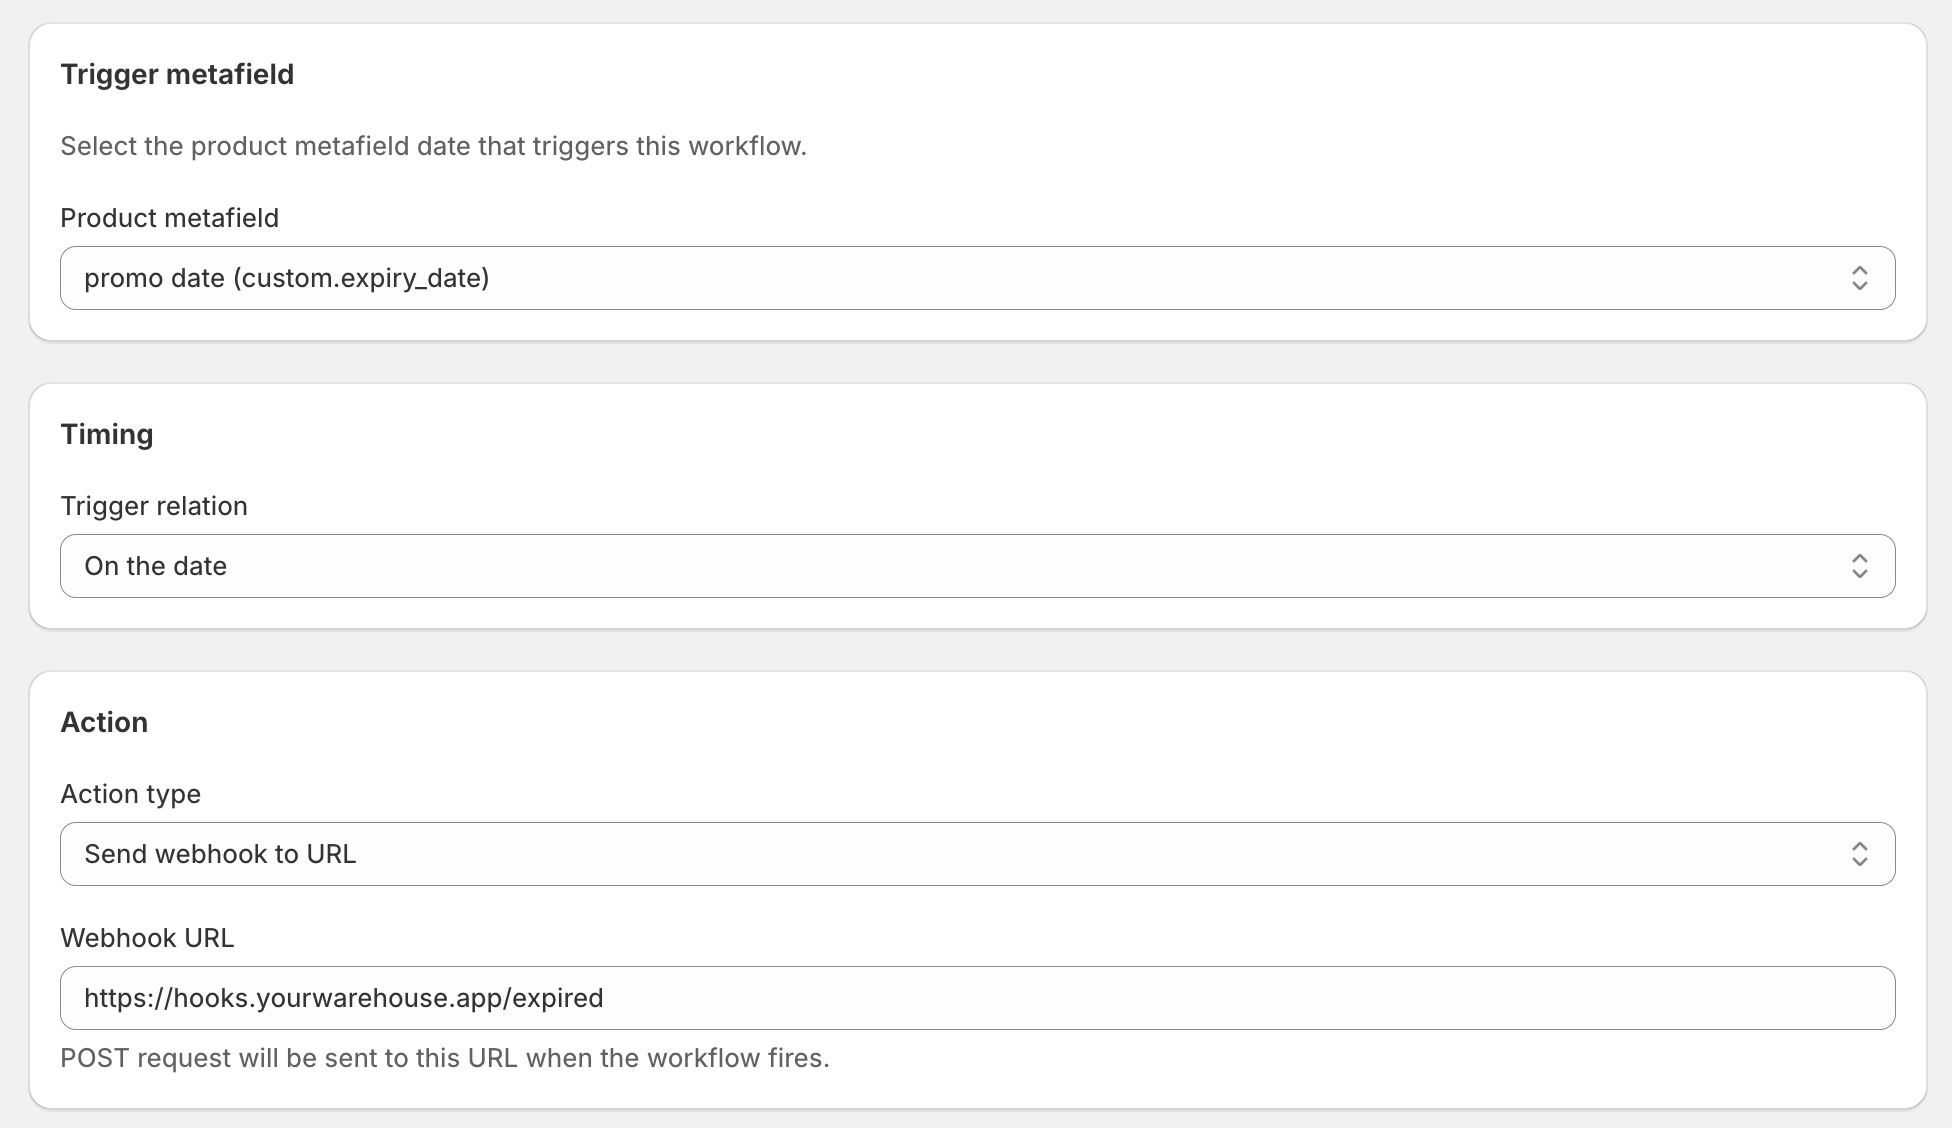
In DateCue, create a new workflow. Pick the product metafield holding the date you want to act on, set the timing (on the date, a set number of days before, or after), choose Fire webhook as the action, and paste in the Make URL.
Timing: On the date
Action: Fire webhook → https://hook.eu2.make.com/abc123xyz
Filter: Status = Active
Step 3: Send a test and map the data structure
From the DateCue workflow editor, use the test button to fire a sample request. In Make, click Determine data structure on the Custom Webhook module, then trigger the test from DateCue. Make receives the payload and maps every field: shopifyProductId, productTitle, productHandle, metafieldValue, executionId, actionType. Every module you add downstream can now reference those fields by name.
Step 4: Build downstream modules
Add whatever comes next: a Google Sheets module to log the row, a Slack module to post a message, an HTTP module to call your ERP. The fields DateCue sent are available as mapped variables throughout the scenario. Save and activate, and the next time the date arrives on a real product, Make runs automatically.
How to set up n8n for a Shopify product date
In n8n, a Webhook trigger node accepts the incoming POST from DateCue and maps its fields automatically. You copy the test URL, fire a test from DateCue, confirm n8n received the payload, then switch to the production URL before you go live.
Step 1: Add a Webhook trigger node in n8n
Create a new workflow in n8n. Add a Webhook trigger node. Set the HTTP Method to POST and leave the path as the generated default. n8n gives you two URLs: a test URL for building and a production URL for live use. Copy the test URL first.
Step 2: Paste the URL into DateCue
Set up the DateCue workflow exactly as above, but paste the n8n test URL. Save the workflow in DateCue.
Step 3: Capture the test payload
In n8n, click Listen for Test Event on the Webhook node. Then use the test button in DateCue to fire a sample request. n8n shows you the incoming data in the node output panel: each field from the DateCue JSON payload is mapped and labelled, ready to use in any downstream node.
Step 4: Build the workflow, then switch to the production URL
Build the rest of your n8n workflow using the mapped fields. When it's ready, copy the Production URL from the Webhook node and update it in DateCue. Activate the workflow. Real date events go to the production URL; the test URL stays separate for debugging.
// DateCue payload received by your n8n Webhook node
{
  "shopifyProductId": "gid://shopify/Product/7821934592010",
  "productTitle": "Vitamin C Serum 30ml",
  "productHandle": "vitamin-c-serum-30ml",
  "metafieldValue": "2026-06-14",
  "executionId": "clx7y2a9b0001",
  "actionType": "WEBHOOK"
}
Verifying the HMAC signature in Make and n8n
If your webhook receiver sits behind a public URL, anyone could POST to it. Adding a signing secret to the DateCue webhook action means every request arrives with an X-DateCue-Signature header containing an HMAC SHA-256 hash of the request body. You compute the same hash on your end and compare. If they match, the request came from DateCue and the body wasn't modified in transit.
This is the same verification approach Shopify uses for its own webhook deliveries. The developer and agency crowd that tends to use Make and n8n usually wants this in place, especially when the webhook triggers a status change or an inventory update downstream.
In n8n, add a Code node immediately after the Webhook trigger. Before any other logic runs, it checks the signature and throws if it doesn't match:
// n8n Code node: add directly after your Webhook trigger node
const crypto = require('crypto');

const secret = 'YOUR_SIGNING_SECRET';
const body = JSON.stringify($input.first().json);
const sig = $input.first().headers['x-datecue-signature'];

const expected = crypto
  .createHmac('sha256', secret)
  .update(body)
  .digest('hex');

if (!sig || sig !== expected) {
  throw new Error('Invalid DateCue signature');
}

return $input.all();
In Make, add a Router module after the Custom Webhook and use a Filter condition on the first route to check that Headers.X-DateCue-Signature equals the expected HMAC value. Make doesn't have a native HMAC function in its built-in tools, so for strict verification the cleanest approach is to route through a short HTTP module calling a serverless function that does the comparison. For lower-stakes automations (Slack notifications, audit log rows), skipping the signature check is reasonable. For anything that touches fulfilment or inventory, verify it.
Three workflows worth building once you're wired in
Once DateCue fires and Make or n8n is listening, any automation you can build in those platforms is within reach of your product dates. The most useful patterns combine an action inside Shopify (handled by a separate DateCue workflow) with an action outside it (handled by Make or n8n). Here are three worth starting with.
Expiry audit trail in Google Sheets
DateCue fires on expiry_date and your n8n or Make scenario appends a row to a Google Sheet: product title, Shopify ID, expiry date, timestamp. Run this alongside a DateCue status-change workflow that sets the product to Draft on the same date, and you get both the storefront action and the permanent audit record in the same minute. If you sell in a regulated category, food, pharma, cosmetics, that sheet is your compliance log. More on the full compliance picture is in this post on expiry compliance automation.
Launch announcement to Slack
Set a launch_date metafield. One DateCue workflow publishes the product on the day. A second DateCue workflow fires a webhook to Make or n8n, which formats and posts a message to your #launches channel: product name, handle, link. Both workflows hang off the same metafield and fire in the same minute. The product goes live and the channel knows, without anyone watching a calendar.
Back-in-stock n8n chain
If you know a restock date in advance (which a lot of wholesale and seasonal sellers do), set it as a restock_date metafield. A DateCue workflow sets the product to Active when the date arrives. A second fires a webhook to n8n, which calls the Klaviyo API to trigger a back-in-stock flow for your waitlist segment. The product republishes and the email sequence starts, both in the same minute, both without a person in the loop.
How does this compare to Zapier for the same setup?
For this specific use case, Make and n8n offer two real advantages: lower per-operation cost at volume, and more control over HMAC verification on the receiver side. If you're already running Make or n8n for other Shopify automation, the DateCue webhook is one new entry point into a stack you already know. No new platform subscription needed.
Zapier charges per task. Every webhook delivery plus every downstream action counts. At a store with hundreds of products firing dates each month, Make's operation model or n8n's execution model tends to be cheaper. n8n self-hosted has no per-execution charge at all, just the server running it, which makes it the obvious choice for agencies handling multiple client stores on one instance.
The DateCue payload is identical across all three platforms: the same JSON body, the same six fields, the same X-DateCue-Signature header available if you need it. Switching platforms later doesn't require changes on the DateCue side. You just update the URL in the workflow.
If you're new to automation tools, Zapier is the friendlier start. Less setup, more hand-holding in the UI. If you're already technical, already in Make or n8n, stay in the tool you know. DateCue fires the same webhook either way.
What this costs
DateCue's webhook action is on the Scale plan at $19 per month. All other actions (change status, add tag, remove tag, email your team) run on every plan, including free. Every paid plan comes with a 14-day trial, so you can wire up the full integration and confirm everything lands before you commit.
On the Make or n8n side: Make's free plan covers a generous number of operations per month for a modest catalogue. Check the Make.com pricing page for current tiers. n8n self-hosted is free beyond server costs; n8n cloud plans are available for teams who don't want to manage infrastructure. Either way, the per-execution cost is lower than Zapier at most volumes.
Build the whole thing, point a real product date at your scenario, and watch it land before you decide it's worth keeping. The date fires, Make or n8n catches it, and you stop thinking about it. That's what this is supposed to feel like.
Frequently asked questions
Can Make.com trigger a scenario when a Shopify product date arrives?
Not natively. Make.com's Shopify integration is event-driven: it reacts when a product is created, updated, or deleted. A date stored in a product metafield isn't an event, so Make has nothing to fire on when it arrives. The fix is to use DateCue as the date-watcher: it fires a webhook to a Make Custom Webhook URL when the date is due, and Make takes it from there.
Can n8n receive a webhook from a Shopify product date?
Yes, once the trigger is set up correctly. n8n's Webhook trigger node accepts incoming POST requests from any source, including DateCue. You add the Webhook node to get a URL, paste it into DateCue's webhook action, fire a test, and n8n maps the payload automatically. DateCue is the part that watches the date and fires the request; n8n handles everything downstream.
How do I verify that a webhook really came from DateCue?
Add a signing secret to the DateCue webhook action. DateCue then signs each request body with HMAC SHA-256 and sends the result in an X-DateCue-Signature header. In n8n, a Code node before your main logic recomputes the HMAC and compares it to the header. In Make, check the header value in a Router or Filter module. If the values don't match, drop the request.
What does the DateCue webhook payload contain?
A JSON body with six fields: shopifyProductId (the Shopify global ID), productTitle, productHandle, metafieldValue (the date that fired), executionId (unique per run, useful as an idempotency key), and actionType. That's enough for Make or n8n to identify the product and route it wherever it needs to go downstream.
Is Make.com or n8n cheaper than Zapier for this use case?
Usually yes, at scale. Zapier charges per task, so every webhook delivery counts. Make charges per operation, which works out cheaper when your scenarios are complex. n8n self-hosted has no per-execution cost beyond server overhead, making it the most economical option for high-volume stores or agencies running workflows across multiple clients. All three platforms support the same DateCue payload.
Which DateCue plan includes webhooks?
The webhook action is part of the Scale plan at $19 per month. The other four actions (change status, add tag, remove tag, email your team) are available on every plan, including free. All paid plans come with a 14-day trial so you can wire up the full Make or n8n integration and test it before committing.
Can I use a self-hosted n8n instance with DateCue?
Yes. DateCue sends the webhook to whatever public URL you give it. If your self-hosted n8n has a public endpoint, the webhook reaches it exactly as it would a cloud instance. The one requirement is that the URL must be publicly accessible; DateCue won't post to localhost or internal network addresses.

Matt Burrell
Founder of Ripen Studio. I build DateCue, and I spend a lot of my week talking to merchants about the small date-automation gaps that Shopify leaves open. More about Matt.
Give your Make and n8n scenarios a date trigger they've never had.
DateCue watches your Shopify product metafields and fires a webhook the moment a date is due. No polling. No custom Shopify app. Just a URL and the right date in the metafield.
Install free on ShopifyWebhook action on Scale ($19/mo). All paid plans include a 14-day free trial.